Okay, so they are not Japanese. But they are RIDICULOUSLY TASTY. And also vegetarian! I totally stole this simply, refreshing, delicious meal idea from Jeri.
Cucumber Avocado Sandwiches - Makes 2 sandwiches
1 ripe Avocado
1 cucumber, sliced
4 slices of bread
Ceasar dressing
Spread dressing on bread according to taste (I put a decent dollop on both slices of bread!)
Lay sliced cucumbers in a layer (or two) on the bread. Slice avocado and place on top of cucumbers. Place second piece of bread on top and - viola. Heaven!
Alternatives: You could also mash the avocado up and spread it on the bread. It would make it a little less messy to eat, I think, but I sort of like the randomness of slices.
Also, I usually cut my bread in half before I make these. It makes them easier to eat.
Wednesday, September 21, 2011
Friday, September 9, 2011
Zaru Soba
An easy, cold, refreshing noodle dish that`s wonderful for a hot summer day. Soba noodles served cold and dipped in a separate sauce before eating. すっきり!

Zaru Soba Serves 2
1 bundle dry soba noodles
Tsuyu (can be bought premade or made yourself)
1 cup dashi
1/4 cup soy sauce
1/4 cup mirin
Green onions, sliced
Optional: nori, shredded into small strips, rayu, other spices and flavorings
To make Tsuyu:
Bring mirin to boil. Add soy sauce and dashi and bring to boil once again. Remove from heat and refridgerate until cold. Can be stored in the fridge for weeks.
Cook soba noodles according to directions. Drain and rinse with cold water until noodles are cold. Drain well. Top with nori, if desired.
Pour tsuyu into a separate, small container (tall contaniers work best; ie, Japanese teacup, etc). Put sliced green onions and any other flavorings into tsuyu.
To eat, take soba noodles, dip into the sauce, and then eat.
Delicious!
No-soup Udon with Mixed Veggies!
I sort of made this up on the spot, and didn`t really measure anything, but here is a vegetarian dish. Soy sauce and sugar make a sweet, thick sauce that goes well with the satsumaimo (purple sweet potato). Mix up this recipe with whatever vegetables you like (or whatever is on sale at your supermarket!!)

No-Soup Udon with Mixed Veggies Serves 2
1 package udon noodles (Pre-cooked or dry, whichever you prefer
Vegetables of your choice!
I used: 1.5 onions, 3 small green peppers, one red pepper, 1 medium satsumaimo (purple sweet potato!)
~1 Tbsp oil (does anyone actually measure oil for stir-frying? I sure don`t)
Soy sauce (I didn`t measure, maybe use about a cup?)
3 Tbsp Sugar
Salt to taste
Optional: red pepper flakes or other spices: black sesame seeds
If using dry noodles, cook then according to directions
Slice vegetables. For Satsumaimo, I recommend slicing at an angle, turning the potato 45, slicing again, etc. This should make chunky, stick-like potato wedges.
Heat oil in frying pan over high heat. Add onions, satsumaimo, and salt (salt helps brown vegetables by drawing out the moisture) and brown, apx 2~3 minutes. Add peppers and brown briefly if desired. Add soy sauce and reduce heat to medium. Cover and simmer until vegetables are tender and much of the liquid is gone. Uncover and add sugar. Cook uncovered for a few more minutes, then add noodles and toss to coat.
Top with black sesame seeds and serve warm.
Thursday, August 11, 2011
So, What IS this Miso stuff??
Considering I just posted TWO miso-centered recipes, I thought I'd do a little research and share what it actually IS, for those who may be interested.

Miso is basically Soy beans. Soy beans and a mould culture, and sometimes another grain, such as rice or wheat. The beans are mixed with the culture and other grain and then fermented for a period of time from several months to several years. The length of fermenation affects the color, flavor, aroma, and color of Miso. (source)
My host family in Yokohama made their own Miso and fermented it for two years. It was phenomenal. So delicious! We would spread it on vegetables and eat it raw.

As you may notice in the picture above, there are different types of miso, too! Red miso and white miso are the most common I've seen.
Interested in making you own? Well luckily for you, I found this handy-dandy HOW-TO!!
Oh, and one more thing to remember when cooking with miso! Don't boil it!! Add it to your soups after everything is already cooked! If you boil miso it will ruin the flavor!
That's all for now!
--JeJira
Miso is basically Soy beans. Soy beans and a mould culture, and sometimes another grain, such as rice or wheat. The beans are mixed with the culture and other grain and then fermented for a period of time from several months to several years. The length of fermenation affects the color, flavor, aroma, and color of Miso. (source)
My host family in Yokohama made their own Miso and fermented it for two years. It was phenomenal. So delicious! We would spread it on vegetables and eat it raw.
As you may notice in the picture above, there are different types of miso, too! Red miso and white miso are the most common I've seen.
Interested in making you own? Well luckily for you, I found this handy-dandy HOW-TO!!
Oh, and one more thing to remember when cooking with miso! Don't boil it!! Add it to your soups after everything is already cooked! If you boil miso it will ruin the flavor!
That's all for now!
--JeJira
Miso Yaki (Broiled Miso [fish])
This tasty broiled fish is marinated prior to cooking and packs a nice flavor. If not overcooked, the fish should also be very tender and juicy.
A Note on Broiling:
Broiled fish is a huge part of the Japanese diet. Thus, every kitchen stove is equipped with a fish broiler. I'm not sure the best way to go about this in America, but baking the fish in an oven would probably be effective. Just research good temperatures to bake the type of fish you choose.
Miso Yaki - 2 servings (this makes quite a lot of marinade, so if you have less fish, cut back slightly or else a lot of miso will go to waste!)
250 g (8oz) White Fish (I used Hokke, which is a type of mackeral)
1/4 cup sugar
2 tsp vinegar
2/3 cup miso
1 tsp fresh ginger
1 tsp green onion - chopped
1/4 cup white wine (White grape juice can be substituted for wine. I couldn't find any white grape juice at my grocery store, so I got the wine)
Cut the fish in 1/2" fillets. Mix the remaining ingrediants and marinate the fish for apx 20 mins. Broil the fish, skin side down, turning once after apx 5-7 minutes.
Great when served with rice and Miso Soup!
**A Note on Broiling Fish!**
To those of you living in Japan (Shout-out to other JETs!), you most likely have a fish broiler in your stove!
 Ta-da!
There will probably be a metal cover on top of the stove. Remove it when broiling your fish! (I forgot this time-- OOPS!!!) Put a little bit of water in the bottom of the broiler pan to make cleaning up easier, and to help the fish stay moist while cooking.
Fish is done when it's nicely browned and flakes easily off of the bone.
And I guess if worse comes to worse, we're in Japan! They eat raw fish all the time over here!!
Cheers!
--JeJira
A Note on Broiling:
Broiled fish is a huge part of the Japanese diet. Thus, every kitchen stove is equipped with a fish broiler. I'm not sure the best way to go about this in America, but baking the fish in an oven would probably be effective. Just research good temperatures to bake the type of fish you choose.
Miso Yaki - 2 servings (this makes quite a lot of marinade, so if you have less fish, cut back slightly or else a lot of miso will go to waste!)
250 g (8oz) White Fish (I used Hokke, which is a type of mackeral)
1/4 cup sugar
2 tsp vinegar
2/3 cup miso
1 tsp fresh ginger
1 tsp green onion - chopped
1/4 cup white wine (White grape juice can be substituted for wine. I couldn't find any white grape juice at my grocery store, so I got the wine)
Cut the fish in 1/2" fillets. Mix the remaining ingrediants and marinate the fish for apx 20 mins. Broil the fish, skin side down, turning once after apx 5-7 minutes.
Great when served with rice and Miso Soup!
**A Note on Broiling Fish!**
To those of you living in Japan (Shout-out to other JETs!), you most likely have a fish broiler in your stove!
There will probably be a metal cover on top of the stove. Remove it when broiling your fish! (I forgot this time-- OOPS!!!) Put a little bit of water in the bottom of the broiler pan to make cleaning up easier, and to help the fish stay moist while cooking.
Fish is done when it's nicely browned and flakes easily off of the bone.
And I guess if worse comes to worse, we're in Japan! They eat raw fish all the time over here!!
Cheers!
--JeJira
Miso Shiru (Miso Soup)
This soup is a staple in the Japanese diet! It can be eaten at ANY meal (yes, that includes breakfast!) It's very simple, and very customize-able with different vegetables or meats or whatever else you have laying around!

Miso Shiru - 1 serving
1 cup dashi*
1 tsp Miso**
Any other vegetables/meat you want to add. Suggestions: Tofu, Moyashi (bean sprouts?), Spinach, Squash, etc etc etc. Anything you have should be good.
*Dashi is fish stock and can be found in several different forms. You can make your own, but I think most common (in America as least) are granules. You can also buy liquid dashi (at least in Japan). I used granules, and put in about 1/2 Tbsp per cup of water. Adjust this according to your taste
**Don't be frugal on the Miso. It's a super important flavor so make sure you buy something that is good quality.
Bowl the dashi. Add in any other ingredients and cook through. Using a ladle, move some broth to a separate bowl. Next we are going to add the Miso. BUT THERE IS A TRICK TO IT. Don't just dish the miso in! You will want some sort of strainer/ladle thing, like THIS:
 Put the miso in the strainer, and slowly dissolve it into the removed broth. When it is all mixed in, return broth to rest of soup and mix. Add more Miso to taste. Serve and top with green onions, if desired.
**BE CAREFUL!**
It is important that you NOT boil the soup AFTER you have added the miso. It will ruin the flavor!
Tonight, I made mine with Kabocha (squash), Moyashi, Tofu, and Komatsuna (I think?? some leafy green thing). It was supppper tasty.
--JeJira

Miso Shiru - 1 serving
1 cup dashi*
1 tsp Miso**
Any other vegetables/meat you want to add. Suggestions: Tofu, Moyashi (bean sprouts?), Spinach, Squash, etc etc etc. Anything you have should be good.
*Dashi is fish stock and can be found in several different forms. You can make your own, but I think most common (in America as least) are granules. You can also buy liquid dashi (at least in Japan). I used granules, and put in about 1/2 Tbsp per cup of water. Adjust this according to your taste
**Don't be frugal on the Miso. It's a super important flavor so make sure you buy something that is good quality.
Bowl the dashi. Add in any other ingredients and cook through. Using a ladle, move some broth to a separate bowl. Next we are going to add the Miso. BUT THERE IS A TRICK TO IT. Don't just dish the miso in! You will want some sort of strainer/ladle thing, like THIS:
**BE CAREFUL!**
It is important that you NOT boil the soup AFTER you have added the miso. It will ruin the flavor!
Tonight, I made mine with Kabocha (squash), Moyashi, Tofu, and Komatsuna (I think?? some leafy green thing). It was supppper tasty.
--JeJira
Wednesday, August 3, 2011
Shoga Yaki
Jessica here! This blog has been terribly ignored and for that I apologize. I figured since I am now LIVING in Japan, I really should post what I make to feed myself!
I made this the other night, so I will post pictures next time I make it (which will be soon. It was so good!)
 (This picture will be replaced with my own next time I make this!)
Shoga Yaki (Ginger (insert your favorite kind of meat here!)
~500g (20 oz?) Meat of your choice! (Pork is most common) (Sliced thin)
1/2 cup soy sauce
1/4 cup mirin
2 cloves of garlic (crushed)
2 Tbsp green onion (finely chopped) {Feel free to use more, though!)
1 tsp fresh ginger- grated
1 tsp oil
*Rice
Mix the soy sauce, mirin, garlic, onions, and ginger in a bowl.
{{*NOTE* I couldn't find cloves or garlic at the super, so I just used powdered. Of course, fresh garlic would be BEST but DO use fresh ginger. This is SHOGA (GINGER) yaki afterall. The ginger is the most important flavor. But it is also VERY STRONG! I used WAY too much the first time I made this. It was still good, but would have been much better with less ginger. A little goes a long way!}}
Pour over meat and marinate for 30-45 mins (Now is a good time to start your rice!!)
Heat oil in a pan. Add meat and brown over high heat. Add the marinade, cover, and cook over medium heat until meat is cooked through (time will vary depending on how thin your meat is cut). Serve with rice!
Serves 2
Enjoy!
I made this the other night, so I will post pictures next time I make it (which will be soon. It was so good!)
Shoga Yaki (Ginger (insert your favorite kind of meat here!)
~500g (20 oz?) Meat of your choice! (Pork is most common) (Sliced thin)
1/2 cup soy sauce
1/4 cup mirin
2 cloves of garlic (crushed)
2 Tbsp green onion (finely chopped) {Feel free to use more, though!)
1 tsp fresh ginger- grated
1 tsp oil
*Rice
Mix the soy sauce, mirin, garlic, onions, and ginger in a bowl.
{{*NOTE* I couldn't find cloves or garlic at the super, so I just used powdered. Of course, fresh garlic would be BEST but DO use fresh ginger. This is SHOGA (GINGER) yaki afterall. The ginger is the most important flavor. But it is also VERY STRONG! I used WAY too much the first time I made this. It was still good, but would have been much better with less ginger. A little goes a long way!}}
Pour over meat and marinate for 30-45 mins (Now is a good time to start your rice!!)
Heat oil in a pan. Add meat and brown over high heat. Add the marinade, cover, and cook over medium heat until meat is cooked through (time will vary depending on how thin your meat is cut). Serve with rice!
Serves 2
Enjoy!
Saturday, May 7, 2011
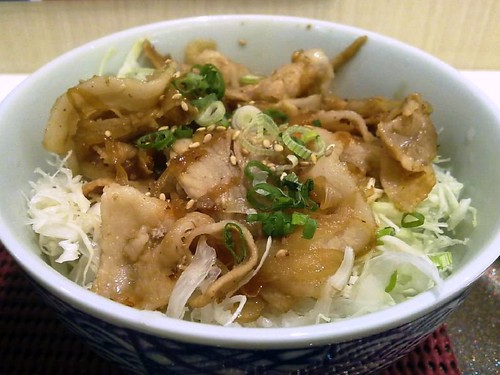
Butadon
Hana here. Today, wanting some donburi but not wanting oyakodon (since I've had it a lot this week already), I dug in to the freezer and found pork! "Buta" is the word for "pig", so "butadon" means "pig donburi". Butadon was my favourite to order when we all went to Yoshinoya for noshing in Japan.
Here's the recipe I used, halfed down. I was cooking for six people, so I used a lot. I'm just making this online recipe a bit smaller, since I'm sure most of you won't be feeding a bussful of teenagers. It's really quite easy, but takes some time.

Butadon - Japanese Pork Bowl
Ingredients:
One onion, thinly sliced
1 1/2 lb pork (I used boneless pork chops)
2 cups dashi
2 tsp sugar
2 1/2 Tbsp soy sauce
2 1/2 Tbsp mirin
1. With some oil in the pan, puts the onions in and cook until soft. These will be in here for awhile, so don't have the heat up very high. Medium should do just fine.
2. Thinly slice the pork (not paper-thin, but you don't want to be chewing on huge hunks of pork) and layer on top of the onions. Stir-fry until just lightly golden-brown.
3. Mix the sugar, soy sauce, and mirin into the dashi (I use about 2 Tbsp of dashi base per cup of boiling water, but you can up or lessen the amount of base depending on your tastes), then pour over the meat and onions.
4. Bring liquid to a boil, then turn down the heat and let it simmer until most of the liquid is gone. Stir around the meat and onions occasionally just to make sure it doesn't burn or stick.
5. Serve over rice.
6. Optional and definitely not needed: you can add some thinly-sliced scallions and/or sesame seeds as a topping.
So it's a lot like the oyakodon, but a bit tastier because of the fat in the pork. You can even put an egg on it if you want (the Japanese do that a lot with hot rice dishes), but for today, just introducing it to a bunch of picky teenagers, I didn't add any egg.
Please enjoy!
Subscribe to:
Comments (Atom)